October 31, 2010

What to do with all that Candy?


Halloween has come and gone and now we have a house full of candy.  What to do with it?

In our house we have a tradition, started years ago when Maren first went trick or treating.  We count the candy, then the child gets to pick out 15 pieces to do whatever they want with.  They can eat it all at once or save it, I don't care.  It's theirs.  The rest they give to mommy in exchange for a book.  We go to the local bookstore and they can pick out whatever book they like (they're still young enough that I'm usually able to influence them a bit, and I have only had to say "no" on a couple of occasions).  Maren likes to choose a Klutz craft book, or an American Girl book.  Joshua usually finds something sportsy.  They love picking out a book at the bookstore, since it's not something we do often due to limited funds.

So then, what do I do with all that candy?  I save some to use as incentives, some for school math games like smarties, m&ms, and other little candies, and some for decorating gingerbread houses in December.  Some of the lollipops and hard candies like Jolly Ranchers get put in our 72 hour kits.  A couple of times we have made "monster cookies", where you make a basic chocolate chip cookie dough but add all your chocolate candies cut up instead of chocolate chips.

But before we do any of the choosing 15, we do some school activities with our candy.  We always sort into piles, and then make a graph, and then read and compare our graphs to see who had the most or least of what.  This year I had bought a balance scale for our homeschool, so we compared the mass of different candies.  We tried to find equal masses, and we used the gram weights to find the mass of a few.  On a couple of the candy packages it said how many grams were supposed to be in there, so we checked to make sure it was true.  The package was a couple of grams off.


October 29, 2010

Pumpkin Sugar Cookies


Every Halloween we have to decorate pumpkin sugar cookies with candy corn and chocolate chips.  It just doesn't feel like Halloween season until we do.  I was lazy this year and used canned frosting (eek!).  When I made the sugar cookies on a stick for the baby shower, I cut out some pumpkins, baked them,  and froze them for this activity, so I didn't have to make another sugar cookie mess. (As you can tell from the photo, my kitchen was already enough a mess)  I let them decorate 2 each.  Christopher liked to spread the frosting around with his fingers as well as his knife.  You know it's a good activity when your kiddos tell you several times how much they love frosting the cookies and thank you for planning it.


Halloween Magnet Haunted House

We've been studying magnets at our homeschool, and playing with them and doing experiments with them.  So yesterday when the kids were playing with them, we thought we could do a haunted house with them.  We got a cardboard box, decorated it to look spooky, and made our people.  We used sphere magnets we had, covered in toilet paper, for our ghosts, and taped a geotrax figure to a magnet to be our unsuspecting victim.  We put the box up on blocks on top of our piano bench.  We controlled the ghosts from above and the girl from below.  We took turns being the girl and telling the story of what was happening.  The kids discovered that if they pulled their wands up, the ghosts would drop, be attracted to the magnet the girl was on, and zoom to her.  They thought it looked like the ghosts were attacking her, which to them was pretty funny.  Maren then decided she needed to write out the story of what was going on, so we would have an official version, so we had an unscheduled writing project.  Perfect.


By the way, Maren is only charging $1.50 a copy for her new book "Lucy and the ghosts" if you're interested.

October 25, 2010

Halloween Decor and Crafts

Well, it's now or never. This is my first post on the amazing Chicken Babies blog. My name is Hayley Neil and I am Erin and Emily's sister in law. I married their goofy little brother John four years ago. We have a two year old little girl named Grace. I am a stay at home mom and I love to design, sew and decorate. It has been exciting to start involving Grace in my creative endeavors. She is still a little young for a lot of things but I try to always give her even a small task to feel involved. I hope it will at least instill within her a love for creating and beautifying.

I have never really decorated for Halloween before but have been wanting to start so that I can make the holidays special for my family. This is the year! Holiday decorations can be expensive and they are only on display for a short time so we decided to make ours this year. I love the eerie, spookiness of Halloween so we went that route.


I scored some great vases, candle sticks, and a ceramic owl at a local thrift store. Then I spray painted everything! The candle sticks were painted a black matte and then sprayed on a really cool spray called Krylon Webbing Spray. It only comes in gold but it pretty much shoots a web of paint onto the surface. It gave the candlesticks a really unique look. Then I sprayed a light coat of black matte over the top once more to just dull down the gold webbing. Complete the look with black and orange taper candles.

The ceramic owl was just painted with a black gloss spray paint.

The vases were sprayed with another really cool Krylon product called Looking Glass Mirror-Like Paint. (I split the cost of all the supplies with a friend.)
You spray this stuff on the inside of any glass surface and it gives it a mirrored look on the outside. Amazing! Then I sprayed a black gloss paint unevenly on the outside so the mirrored would show through but it would look dirty, old, and creepy. The roses are just fabric red roses that I painted with a black matte.

Holidays are not complete without a wreath on the front door so we made our spooky Halloween version. The wreath was just a dry, natural looking brown wreath that I picked up from the thrift store as well. I sprayed it black like everything else and added some black ribbon and black crows from a craft store. It is definitely creepy and I think I read somewhere that a black wreath signifies death in the home. Which is a kind of perfect for Halloween but a bit too scary for kids so I kept that bit of information to myself when Grace and I were making this.

Obviously a two year old is too young to be doing any spray painting so I just let her help me set everything up to paint it and then asked her opinion on each piece as I was going. She was thrilled to be a part of "mommy's project" for Halloween. Then we did a more kid-friendly project. She helped me draw and cut out the shapes for our Halloween garland. We cut everything out of glitter craft foam. We made a pumpkin, skull, bat, witch hat, ghost, and black cat. She loved helping with the cutting and gluing the best.

I hope to keep expanding on our decorations each year and having Grace be more involved. It has definitely made October and the build up to Halloween a lot more fun and memorable.

Spooky Spider Hats


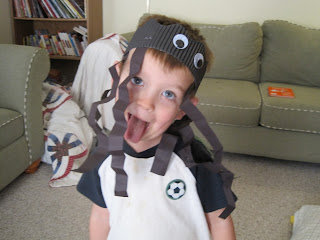
My mother-in-law came over for a morning a couple weeks ago and let me get out of the house alone.  When I came home, I found the kids running around in these spider hats.  They looked pretty simple to make.  She used some bulletin board border she had for the top, but I'm sure black construction paper would work just as well.  The legs are just folded paper stapled on and the googly eyes are glued.  The kids loved making them and chasing each other around.

Pumpkin Pumpkin Pancakes


The other day I thought it would be fun to make pumpkin shaped pancakes from a pumpkin pancake recipe I have.  I thought they would enjoy "carving" a face while they ate.  I just scooped out a bit of the already orange batter into a bowl and added some green food coloring.  I thought the kids would think it was so fun.  Instead, Joshua came in and said "the stems on pumpkins are brown, not green mom.  Nice try though."  Then Maren was complaining because she couldn't carve it the way she wanted to, and Christopher refused to eat it at all and threw a huge fit when Jason started to cut it up for him.  Apparently he really liked the pumpkin shape too much to eat it or want it ruined.  So, it didn't exactly work out as I hoped, but here's the recipe if you want to try.  It's from a book called "Kid favorites made healthy" by Better Homes and Gardens.

Peter Pumpkin Pancakes
2 cups all-purpose flour
2 Tbls. packed brown sugar
1 Tbls. baking powder
1/2 tsp. salt
1/2 tsp. pumpkin pie spice

1 1/2 cups milk
1 cup canned pumpkin
1 whole egg plus 1 egg white
2 Tbls. oil

Mix dry ingredients in medium bowl.  Mix wet in seperate bowl.  Then pour wet into dry and mix just until moistened (batter should be lumpy).  Cook over medium heat in skillet or griddle, turning to 2nd side when surface is bubbly and edges are slightly dry.

The book suggests serving with an orange syrup, but we used normal syrup and liked them.  The babynater liked them without any syrup at all.  And they do turn a bit brown if you cook them too long or the griddle is too hot, so they don't look quite as cute.  I burned Joshua's so his stem was nice and brown.  Hwaa, ha, ha, ha.

October 24, 2010

Cookies on a stick


This isn't really an activity I do with my kids, but it's something they think is really fun to eat, so I thought I would share.  I made these for a baby shower I helped with on saturday.  They are sugar cookies on a bamboo skewer that I used as centerpieces for the food table and then the guests took them home as a favor.  They are not too hard to make and look really cute.

This is the sugar cookie recipe I use:

1/3 cup butter
1/3 cup shortening
3/4 cup sugar
1 egg
1 tsp. vanilla
1 Tbls. milk
2 cups flour
1 tsp. baking powder
1/4 tsp. salt

Cream the butter, shortening, sugar, egg, vanilla and milk.  Beat it until it's light and fluffyish.  add dry ingredients.  chill.  roll on floured surface and cut with cookie cutters.  Bake on parchment lined cookie sheet for 8 - 10 min. at 375 degrees.

I usually double or triple the recipe, because I figure if you're going through the trouble of making sugar cookies you might as well make a lot.   For stick cookies, I roll them a little thicker than usual.  You can use fancy cookie sticks which look a bit nicer, or just use the bamboo skewers, which are cheaper and work just as well.  I like them better because they have a sharp point which helps in pushing them into the bottom of the cookie.  Push the skewer in from the bottom of the cookie  to near the top of the cookie, being careful not to come out the top.  I usually twist it back and forth a little to help get it up, and place my other hand on top of the cookie to keep the dough down.

Bake at 375 for 8 to 10 minutes.  You want them to be slightly brown around some of the edges.  Remove from pan to cooling rack and let cool.


Here is the recipe for the Royal Icing I use to frost them:

3 Tbls. meringue powder
4 cups powdered sugar
6 Tbls. warm water

Beat until it forms peaks, about 7 to 10 minutes.  You can cover the bowl with a wet towel to keep the frosting from drying out while you work.

I fill a decorating bag with white frosting and pipe the outline of the cookie, or whatever shape I want on the cookie.  I let that dry.  Then I put some frosting in a bowl and add a teaspoon or so of water along with some food coloring and mix it up.  The frosting will be more flowy, but not too runny or you'll get lots of bubbles.  If you added too much water, just add some more white frosting from the big bowl until you get the right consistency.  I use a knife to spread around the inside color and it will usually be flowy enough that the knife marks eventually disappear.  If the cookie has lots of small spaces, sometimes I fill a decorating bag and use that to pipe in the color.


After the frosting dries, I wrap them in plastic wrap and tie a bow at the bottom.  I usually make them a day ahead so they have time to sit all wrapped up, because then the cookie gets softer, and I think it's yummy when the cookie is soft and the frosting is hard.  The day of the party, I arrange them in a container that has the green florist foam in the bottom and colorful tissue paper, cutting some of the sticks to make them shorter.

Is this the best way to make these cookies?  Probably not.  I'm not a professional and there are probably people with better techniques for cookie making, but this is what works for me.

October 12, 2010

Some Favorite Halloween Books


I love seasonal picture books!  I love to collect them and read them with my children!  Here are a few of our halloween favorites to read together:


There isn't much to read, but the kids really like to lift  the flaps and pull the tabs and spin the wheels in this one.  

We enjoy the rhyming text and pictures of a monster mama and son doing things together just like the human people.  And the kids think it's really gross when she cooks him cookies filled with bugs instead of chocolate chips.
 This has been one of my favorite halloween books since I saw it many years ago.  It just makes me laugh.  It's a bit gross, with brains flopping on the stage and eyeballs rolling around, so maybe not for the younger crew, but I enjoy reading it with my almost 8 year old.


This is a book I used to read aloud to the 1st and 2nd graders in schools.  The kids like to say the repeating text along with the reader, and although it's a bit spooky, it's not scary.  The kids like the clever ending also.


These are just a few of our favorites.  Does your family have a favorite Halloween book?

October 7, 2010

Apple Day

The kids really enjoyed our Teddy Bear day a few weeks ago, and so I decided to do another themed day, this time in honor of Johnny Appleseed's birthday on Sept. 26, although we didn't do anything until friday.  We had gone apple picking a couple of weeks before, and had some badly bruised apples left over, which we used for apple printing, which was probably the kids favorite activity.

Yay!  Paint! 

We also talked about varieties of apples, and did some apple math word problems for Maren and Joshua.  We learned about Johnny Appleseed and watched the disney video.  We made applesauce while we talked about solids, liquids, and gases and heat causing irreversible change.  Maren wrote directions for making applesauce.  For Christopher, we made necklaces out of Apple Jacks.  The older kids estimated how many Apple Jacks were in their cup, and then counted to figure out how close they were, before they made their necklaces. 

Joshua put his apple jacks into groups of 10 to help him count

The kids really look forward to theme days, so I think I'll use them as a reward for good school work.  If they do a certain number of days of school work without complaining or throwing fits (hard to believe my kids do that, right? Ha!)  then we'll do a fun theme day.  

"mom, I'm trying to watch the show"

October 6, 2010

Making Music Videos

When my boys were 2 and 3 years old, we made a short music video to one of their favorite songs. It was so much fun and turned out so cute that we now make one music video a year. This is our fifth year for the music video tradition. When we listen to music, I am always thinking if it would make a good music video. Picking the song is usually the hardest part. The first video was to "Clap Your Hands" by They Might Be Giants. Video #2 was set to "The Goldfish" by Laurie Berkner. Backyardigans songs make for great videos, and we used "A Pirate Says Arrr" and "I Love Being a Princess" for the next two years. This year's video is to "The Eye of the Tiger."

Some tips for making a great music video:

  • Get the kids involved in the whole process. The kids help me pick the song, plan costumes, and make scenery (if any.) I also talk to them about what they want to do in the video.
  • I make a list of shots I want to get before going out to shoot the video. Depending on their age, you may only have a short window of cooperation.
  • Take LOTS of video. For this last video, I uploaded 40 minutes of video, and edited it down to a 2 and a half minute song.
  • Shoot a variety of shots. Take some up close, some from a distance, and different angles.
I use iMovie to do my editing. I put some video up in the editing window, turn off the video audio and add the song track. Then I can cut the video clips to the right timing in the music.


October 5, 2010

Halloween Treat Bags


While Jason was gone a couple of weekends ago, I decided to do a little sewing.  I've been wanting to make halloween treat bags for years, because usually the kids just use whatever bucket or easter basket we have lying around the house, and I'd thought it would be nice to have them use the same thing each year.  I made a simple bag out of black bottomweight fabric I found near the denim at Joann's and some sparkly halloween fabric I let Joshua pick out.  Then I printed out pictures of the kids from past halloweens onto Avery dark fabric iron on transfers and ironed them onto the bags. I thought it'd be a nice way to remember what they were every year.  I was a bit worried that the pictures wouldn't work and I would ruin the bags, but I was happy with how they turned out.  I did Joshua's first, and I had cut around him in each iron on transfer, but with Maren and Christopher's, I printed the pictures out smaller, 2x3, and left some white around them.  I think it looks nicer that way.  Too bad for Joshy.  He doesn't care though.  He was just happy his was made first.  The kids really like seeing their pictures on the bags.